
Integrate Pay by Bank
Decide on the checkout experience
This controls whether the hosted checkout offers:
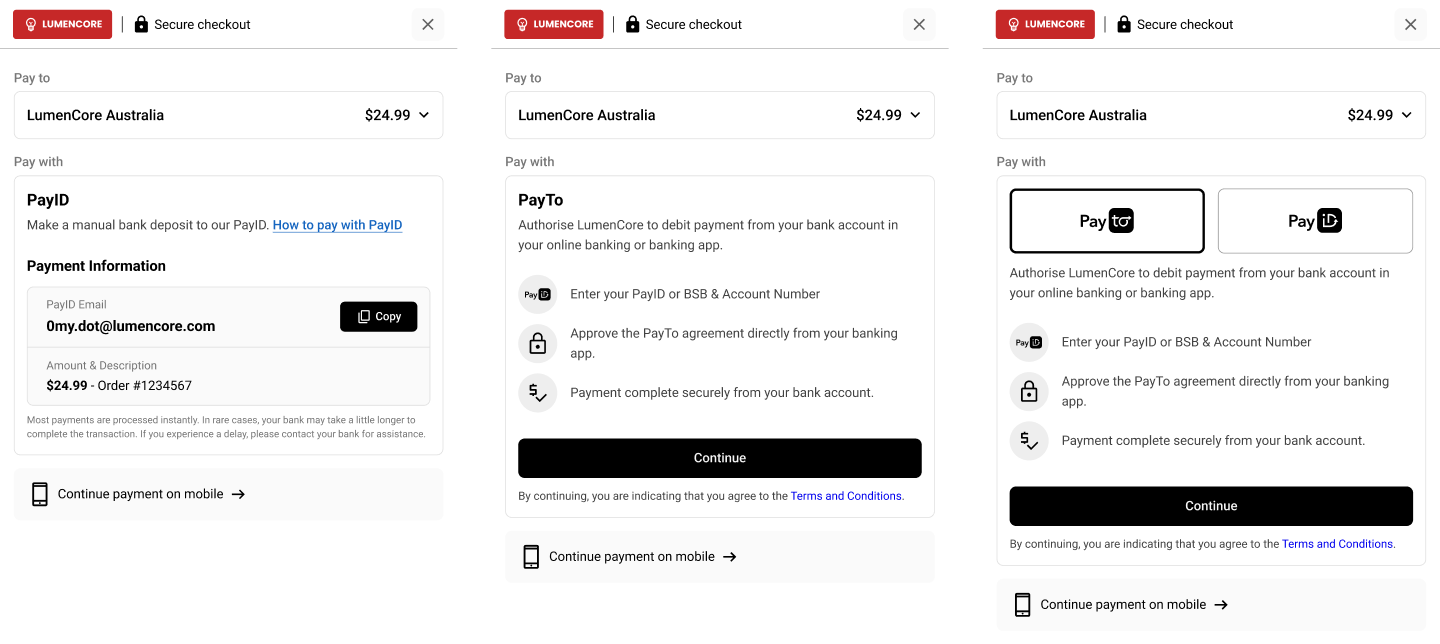
Checkout configurations showing PayID only (left), PayTo only (middle), and combined PayID/PayTo selection (right).
PayID only
The Pay by Bank App supports several payment collection patterns through the same Payment Request API. The main difference is how you configure the PaymentRequest payload and how your checkout configuration is set up.
| Payment flow | Best for | Key payload behaviour |
|---|---|---|
| Dynamic PayID | One-time transaction payments | Set an amount and let Azupay generate the PayID |
| Multi-payment PayID | Instalments or split payments | Set an amount and enable multiPayment |
| Open PayID | Wallet top-ups and flexible funding | Enable multiPayment and provide a reusable payID without a fixed amount |
| Reusable PayID | Periodic or customer-linked billing | Provide a fixed payID and amount so the same PayID can be reused over time |
Dynamic PayID
Use Dynamic PayID when you want a one-time payment request for a specific transaction.
{
  "PaymentRequest": {
    "clientTransactionId": "b844123d-0f45-498d-bcd3-ff84cd267407",
    "paymentAmount": 150.00,
    "paymentDescription": "Order 12345"
  }
}Our internal logic will apply overpayment and underpayment protection to automatically return funds over the specified amount, and reject funds less than the specified amount.
sequenceDiagram
    participant MB as Merchant Backend
    participant API as Azupay API
    participant UX as Pay by Bank App
    participant C as Customer
    participant BANK as Customer Bank

    MB->>API: Create Payment Request
    API-->>MB: Return checkoutUrl + generated PayID
    MB->>C: Redirect customer to checkoutUrl
    C->>UX: Open checkout
    C->>BANK: Pay exact amount
    BANK-->>UX: Payment confirmed
    UX-->>C: Show payment success
Multi-payment PayID
Use Multi-payment PayID when you want to accept multiple payments toward a target amount.
{
  "PaymentRequest": {
    "clientTransactionId": "b844123d-0f45-498d-bcd3-ff84cd267407",
    "paymentAmount": 100.00,
    "paymentDescription": "Invoice 98765",
    "multiPayment": true
  }
}Setting
multiPaymenttotrueallows this transaction to receive multiple payments. Our internal logic will apply overpayment protection to automatically return funds over the specified amount.
sequenceDiagram
    participant MB as Merchant Backend
    participant API as Azupay API
    participant UX as Pay by Bank App
    participant C as Customer
    participant BANK as Customer Bank

    MB->>API: Create multi-payment request
    API-->>MB: Return checkoutUrl + generated PayID
    MB->>C: Redirect customer to checkoutUrl
    C->>UX: Open checkout
    C->>BANK: Make first partial payment
    BANK-->>UX: Partial payment confirmed
    UX-->>C: Show amount remaining
    C->>BANK: Make additional payment(s)
    BANK-->>UX: Final payment confirmed
    UX-->>C: Show payment complete
Open PayID
Use Open PayID when you want to assign a reusable PayID to a customer so they can pay any amount over time.
{
  "PaymentRequest": {
    "clientTransactionId": "b844123d-0f45-498d-bcd3-ff84cd267407",
    "paymentDescription": "Wallet top up",
    "payID": "[email protected]",
    "multiPayment": true,
    "paymentExpiryDatetime": "2027-12-31T23:59:59Z"
  }
}Setting
multiPaymenttotrueand specifying thepayID(typically based on a customer ID) provides a PayID that is specific to a customer and allows the PayID to receive multiple payments.
sequenceDiagram
    participant MB as Merchant Backend
    participant API as Azupay API
    participant UX as Pay by Bank App
    participant C as Customer
    participant BANK as Customer Bank

    MB->>API: Create Payment Request with reusable PayID
    API-->>MB: Return checkoutUrl and customer PayID
    MB->>C: Present reusable PayID or redirect to checkout
    C->>BANK: Send payment of chosen amount
    BANK-->>UX: Payment confirmed
    UX-->>C: Show updated payment status
    Note over C: The same PayID can be used again later
Reusable PayID
Use Reusable PayID when you want a customer-specific PayID that can be used again for future payment cycles.
{
  "PaymentRequest": {
    "clientTransactionId": "b844123d-0f45-498d-bcd3-ff84cd267407",
    "paymentAmount": 86.50,
    "paymentDescription": "Monthly bill for May",
    "payID": "[email protected]",
    "paymentExpiryDatetime": "2027-12-31T23:59:59Z"
  }
}
Specifying the
payIDprovides a PayID that is specific to a customer and allows the PayID to collect exactly the specified amount. Once collected, the PayID will no longer accept payments until it is registered again via a payment request.
sequenceDiagram
    participant MB as Merchant Backend
    participant API as Azupay API
    participant UX as Pay by Bank App
    participant C as Customer
    participant BANK as Customer Bank

    MB->>API: Create Payment Request with customer PayID
    API-->>MB: Return checkoutUrl
    MB->>C: Redirect customer to checkoutUrl
    C->>UX: Open checkout for this billing cycle
    C->>BANK: Pay bill amount
    BANK-->>UX: Payment confirmed
    UX-->>C: Show payment success
    Note over MB,API: Merchant can reuse the same PayID next billing cycle
PayTo only:
If PayTo is enabled in the Pay by Bank App, the hosted checkout can support several PayTo journeys depending on your setup.
| Payment Flow | Best for | What happens in checkout |
|---|---|---|
| Once-off PayTo | Single authorised payments | The customer authorises one payment directly from their bank account |
| Recurring PayTo | Repeat payment collection | The customer sets up an ongoing PayTo agreement for future payments |
| Pay & Subscribe | Upfront plus recurring payments | The customer pays now and also sets up an ongoing recurring agreement |
Note that not all combinations of PayID payment flows and PayTo payment flows are compatible. We recommend you discuss the exact configuration with your Implementation Manager during onboarding.
PayTo in checkout
PayTo is not enabled just by changing the PaymentRequest payload.
To offer PayTo in the Pay by Bank App, your checkout configuration must be set up to support it.
Checkout experience options
Your Pay by Bank configuration can be set to:
- PayID only
- PayTo only
- PayID and PayTo
These configurations can be applied in the Azupay dashboard.
Show only the PayID payment experience in checkout.
Show only the PayTo payment experience in checkout.
Offer both payment methods in the same hosted checkout and let customers choose.
PayTo payment patterns in checkout
If PayTo is enabled in the Pay by Bank App, the hosted checkout can support several PayTo journeys depending on your setup.
| PayTo pattern | Best for | What happens in checkout |
|---|---|---|
| Once-off PayTo | Single authorised payments | The customer authorises one payment directly from their bank account |
| Recurring PayTo | Repeat payment collection | The customer sets up an ongoing PayTo agreement for future payments |
| Pay & Subscribe | Upfront plus recurring payments | The customer pays now and also sets up an ongoing recurring agreement |
Once-off PayTo
Use Once-off PayTo when you want the customer to authorise a single payment during checkout.
Best for:
- one-time purchases
- account settlement
- higher-value authorised payments
What to expect:
- the customer selects PayTo in checkout
- they review the payment details
- they approve a single authorised payment in their banking environment
- no ongoing recurring agreement is created
Recurring PayTo
Use Recurring PayTo when you want the customer to set up an ongoing PayTo agreement for future collections.
Best for:
- subscriptions
- memberships
- instalment plans
- repeat service billing
What to expect:
- the customer selects PayTo in checkout
- they review and approve a recurring agreement
- future payments can be collected under that agreement
- where enabled, passkeys can support a faster returning-user experience
Pay & Subscribe
Use Pay & Subscribe when you want to collect a payment immediately and also establish a recurring agreement for future payments.
Best for:
- subscription sign-up flows
- memberships with an upfront fee
- services that begin immediately and continue on a recurring basis
What to expect:
- the customer completes a payment now during checkout
- the customer also authorises an ongoing PayTo agreement
- the flow combines immediate collection with future recurring billing
Both PayID and PayTo
If both PayID and PayTo are enabled:
- customers can choose between the two payment methods in the hosted checkout
- you can set which option appears first using
defaultLandingProduct - the same Pay by Bank integration can support different payment behaviours depending on your checkout configuration
sequenceDiagram
    participant MB as Merchant Backend
    participant API as Azupay API
    participant UX as Pay by Bank App
    participant C as Customer

    MB->>API: Create Payment Request
    API-->>MB: Return checkoutUrl
    Note over MB,API: Checkout config controls PayID, PayTo, or both
    MB->>C: Redirect customer to checkoutUrl
    C->>UX: Open hosted checkout
    UX-->>C: Show PayID only, PayTo only, or both
    C->>UX: Select preferred payment method
Updated 3 months ago