
Clover Integration
This guide explains how to onboard your business to Azupay Pay by Bank using a Clover terminal. The onboarding process is completed directly on the terminal and allows Azupay to verify your business and settlement bank account so you can begin accepting Pay by Bank payments.
Integrating via Clover
Use this guide when you want to enable Azupay Pay by Bank on your Clover terminal.
The Clover integration allows you to onboard your business directly from the terminal and then accept PayID and/or PayTo payments through Azupay Pay by Bank.
Overview
With the Clover integration, you can:
- onboard your business from the Clover terminal
- connect your settlement account
- accept Pay by Bank payments in-person through Clover
- offer PayID, PayTo, or both, depending on your agreed setup
This is best suited to merchants who want to accept account-to-account payments through a Clover point-of-sale environment.
Before you begin
Before opening the Azupay app on your Clover terminal, make sure you have the following details ready:
- Australian Business Number (ABN) — 11 digits
- Settlement bank account details
- BSB — 6 digits
- Account number — 4 to 9 digits
- Account name — up to 140 characters
You will need these details during onboarding to verify your business and configure settlement.
Onboard your business in Clover
Once verification is complete, you will see *
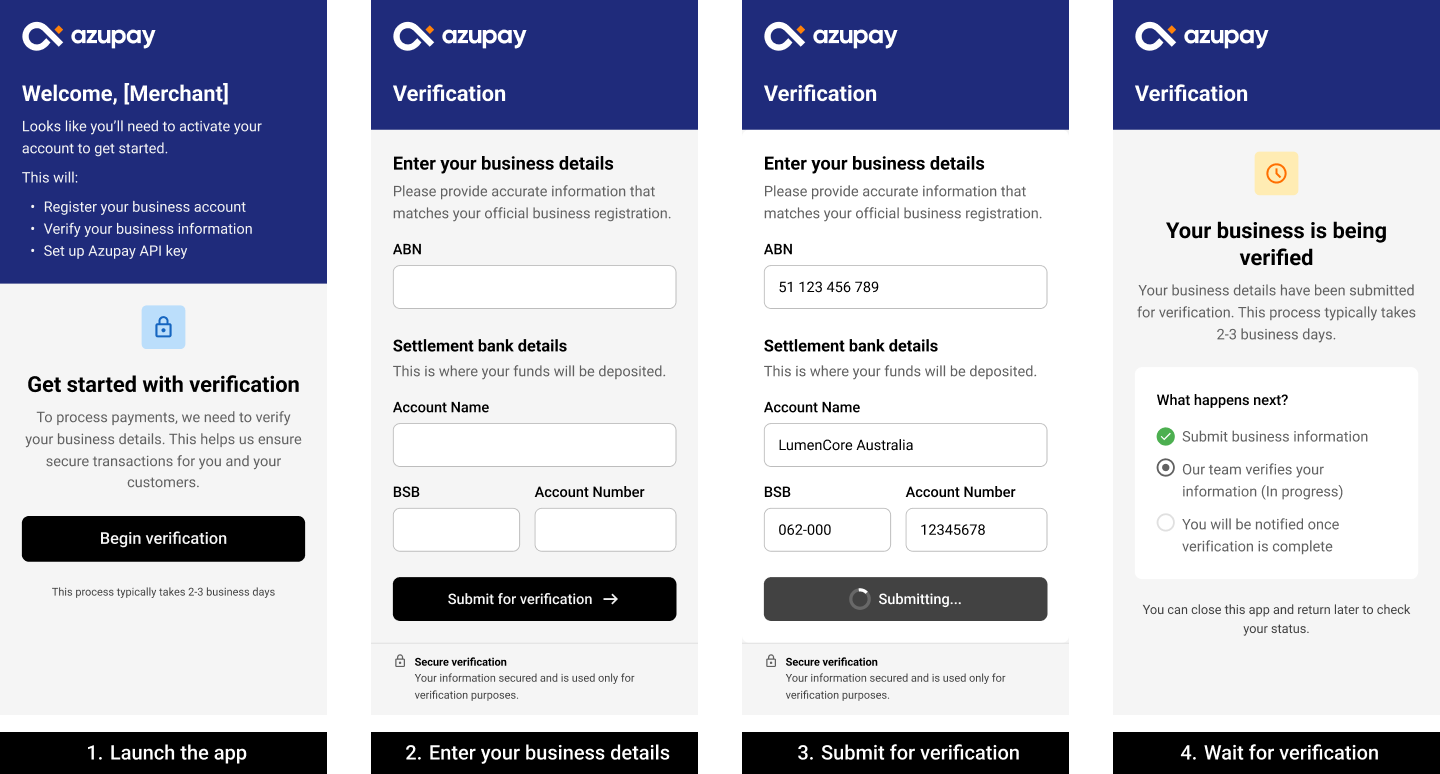
Step 1: Launch the app
- Turn on your Clover terminal.
- Open the Azupay (Pay by Bank) app.
When the app launches, Azupay checks your onboarding status.
If no merchant account exists, you will be shown a Welcome screen.
- If your merchant name is available, it will be displayed.
- If not, you can still continue with onboarding.
Select Begin verification to continue.
Step 2: Enter business and bank details
You will be taken to the Verification screen.
Enter the following:
- ABN — 11 digits
- Account name — up to 140 characters
- BSB — 6 digits
- Account number — 4 to 9 digits
Before submission, the app validates each field.
If any information is missing or incorrectly formatted:
- the affected field will be highlighted
- a clear error message will explain what needs to be corrected
Your details will not be submitted until all fields are valid.
Step 3: Submit your details
Once all details are valid, select Submit for verification.
A loading message will appear while your details are securely submitted. This step may take up to 60 seconds.
Step 4: Wait for verification
After successful submission, you will see the Your business is being verified screen.
This screen shows your onboarding progress, including:
- business details submission — complete
- KYB verification — in progress
No further action is required while verification is in progress.
If submission fails
If submission fails because of a network issue or unexpected error, an error screen will be shown.
You will be able to:
- select Try again
- select Close and return to the Welcome screen
Your details are not submitted unless the process completes successfully.
Returning to the app
The Azupay app remembers your onboarding status.
Verification in progress
When you reopen the app, you will return to the Your account is being verified screen.
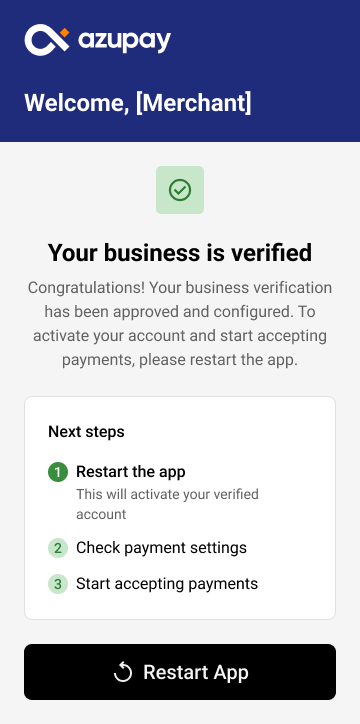
Verification complete
Your account has been verified* with an option to restart the app.
After restarting, the app will open in its ready-to-use state.
Once verification is complete, you will see *
If you experience issues during onboarding or have questions about your verification status, please contact Azupay Support or your Azupay account representative.
Once verification is complete, you will see *
Taking a Pay by Bank payment on Clover
Once onboarding is complete, you can begin accepting payments through Clover.
Step 1: Start a new sale
From the Clover home screen, open Register.
If your Clover setup supports multiple outlets or merchant profiles, confirm that you are using the correct one.
Step 2: Add the product or service
Choose one of the following options.
Option A: Add an item from your catalog
- Tap Items or browse the item grid
- Select the product or service to add it to the sale
- Repeat for any additional items
Option B: Enter a custom amount
- Tap Open Item, Custom Amount, or Misc Item depending on your Clover setup
- Enter the amount to charge
- Add a description if needed
Step 3: Adjust the sale if needed
Before taking payment, review the sale and make any required updates:
- update quantity
- add modifiers if your catalog uses them
- apply discounts or promotions if enabled
- confirm the subtotal, tax, and total are correct
Step 4: Initiate payment
- Tap Pay or Charge.
- Select Pay by Bank as the payment method.
Step 5: Present the payment flow to the customer
If Clover switches to customer-facing mode:
- hand the terminal to the customer, or rotate it toward them
- ask them to follow the on-screen prompts
- they will complete the payment through Azupay’s Pay by Bank experience
The payment experience shown to the customer is illustrated below.
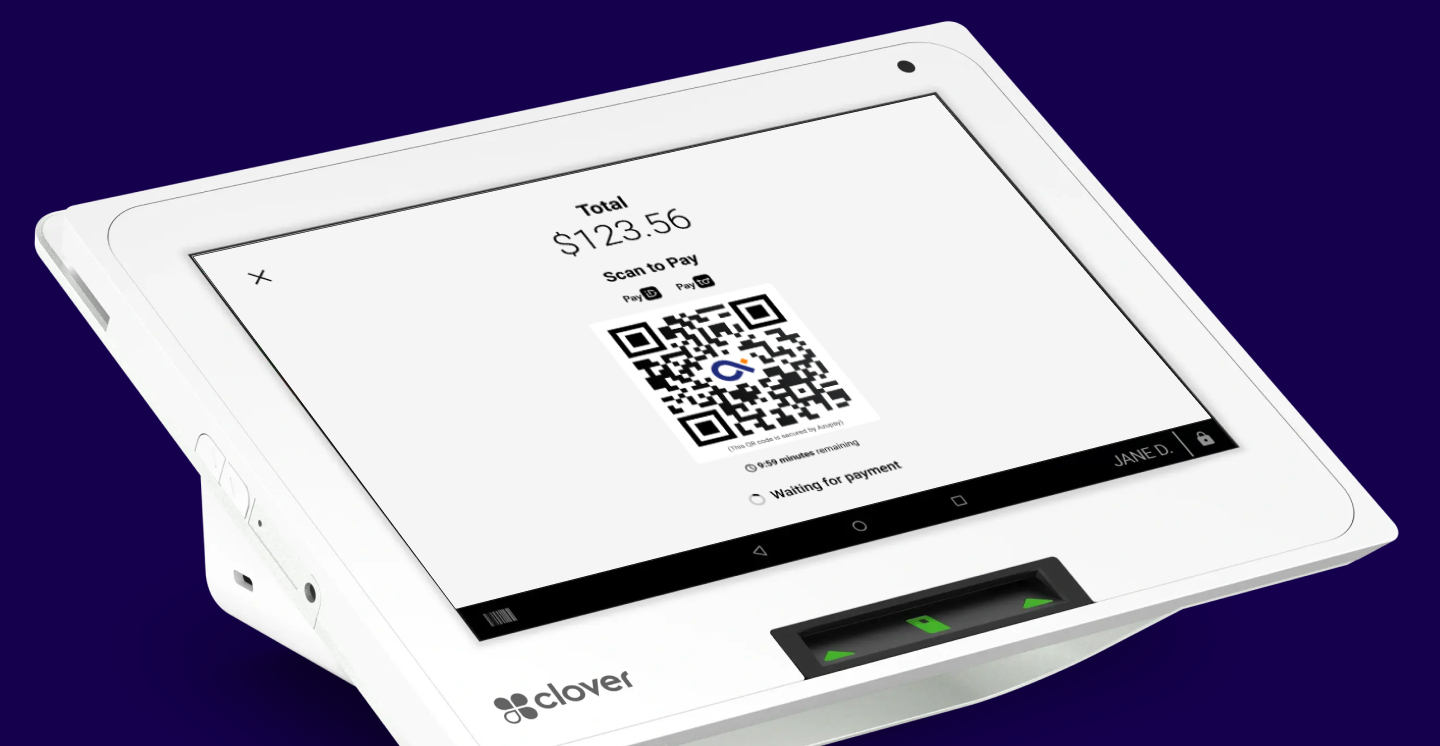
For more detail on Pay by Bank payment features and customer flows, see the Pay by Bank guide.
Step 6: Confirm the result
Wait for the Clover confirmation screen, such as:
- Approved
- Payment successful
Also confirm that the sale appears as completed in:
- the Register screen
- and/or Transactions
Step 7: Provide a receipt if needed
Choose a receipt option if prompted:
- SMS
- No receipt
FAQs
What do I need before onboarding?
Before starting onboarding, make sure you have:
- your ABN
- your settlement BSB
- your settlement account number
- your settlement account name
What happens if my details are invalid?
The app validates your ABN and bank account fields before submission.
If anything is missing or incorrectly formatted:
- the relevant field will be highlighted
- an error message will explain what needs to be corrected
- your details will not be submitted until the issue is resolved
What happens while my business is being verified?
After submission, the Clover app shows your verification progress.
No further action is required while verification is in progress.
How do I know a payment was successful?
A successful payment will show a Clover confirmation screen, such as Approved or Payment successful.
You should also see the completed sale in Clover Register or Transactions.
Need help?
If you need help with onboarding, verification, or taking payments on Clover, contact Azupay support and include:
- your business name
- your Clover merchant or outlet details, if relevant
- whether the issue relates to onboarding, verification, or payment
Updated 2 months ago