
Configurations
Configuration
Use configuration settings to control how the Pay by Bank App is launched, which payment options are offered, and how the hosted checkout experience looks and behaves.
This page covers the main settings available for the Pay by Bank App, including:
- launch mode
- payment experience options
- default payment method order
- suggested payer details
- branding
- additional settings managed by Azupay support
At a glance
| Configuration area | What it controls |
|---|---|
| Experience (Hosted/iFrame) | Whether the payment experience opens as a hosted redirect or inside an iFrame |
| Payment experience options | Whether customers see PayID, PayTo, or both |
| Default payment method | Which payment option is shown first when both are enabled |
| Suggested payer details | Whether payer details are prefilled to streamline checkout |
| Branding | Your logo and theme colour in the hosted payment experience |
| Support-managed settings | Additional PayTo behaviour configured by Azupay support |
Configuration options
Experience (Hosted/iFrame)
Choose how customers enter the Pay by Bank App.
Redirect checkout
- opens the hosted payment experience as a full-page journey
- best when you want a simple, dedicated payment flow
- suited to most implementations
iFrame checkout
- embeds the hosted payment experience inside your own page
- best when you want the payment step to remain within your existing journey
- useful when maintaining an on-page checkout experience is important
- manage the iFrame based on webhooks from the paymentRequest API
What to expect
- both options use the returned
checkoutUrl - the same hosted payment experience is used, but the way it is presented to the customer differs
Payment experience options
Choose which payment methods customers can use in the Pay by Bank App.
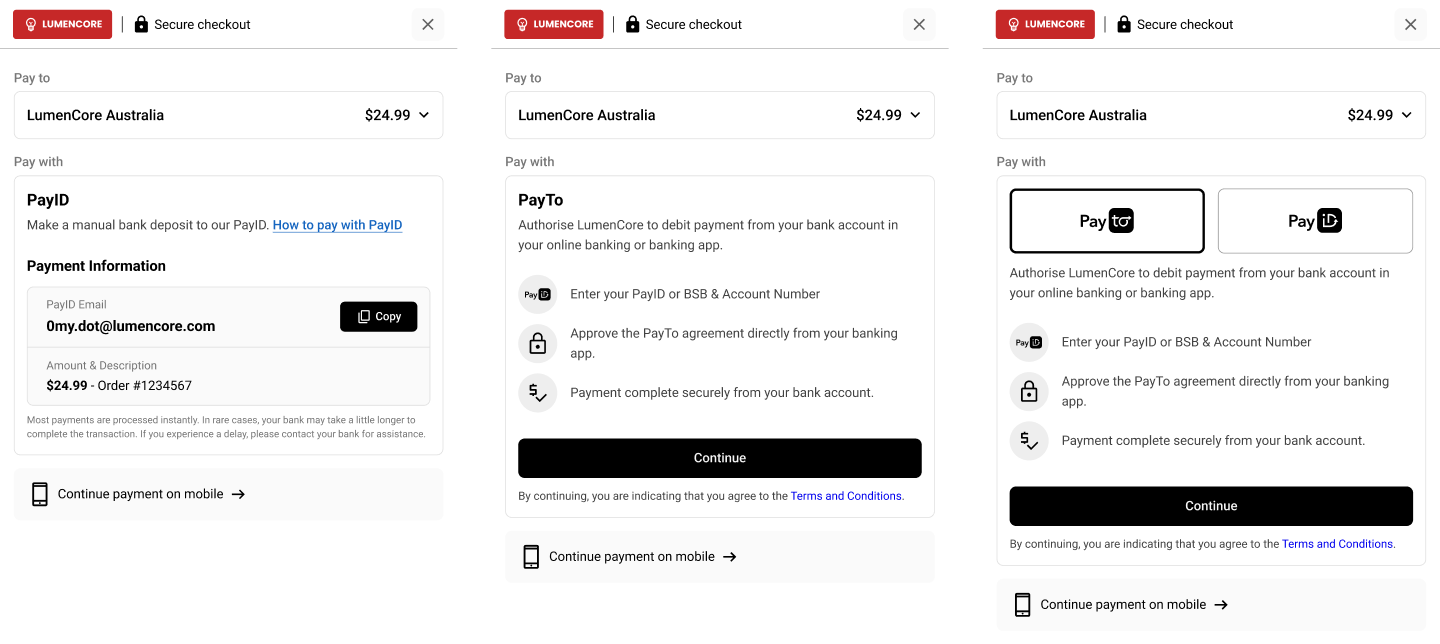
PayID only
- offer real-time account-to-account payments using PayID
- suited to transaction-based payments, customer-linked payments, and flexible funding flows
PayTo only
- offer authorised bank payments using PayTo
- suited to once-off or recurring agreement-based payment journeys
PayID and PayTo
- offer both payment methods in the same hosted experience
- suited when you want to give customers a choice between payment types
What to expect
- the payment methods shown in checkout will reflect your configured experience
- if both are enabled, you can choose which one is shown first
- these settings are self-service through the Azupay Dashboard
Default payment method
If both PayID and PayTo are enabled, you can choose which payment option the customer sees first.
Default to PayID
- best when PayID is your primary payment collection method
- useful for transaction-based and customer-linked payment flows
Default to PayTo
- best when PayTo is your preferred payment experience
- useful when agreement-based payments are the primary use case
What to expect
- customers can still switch between payment methods when both are enabled
- this setting controls the default landing experience only
- these settings are self-service through the Azupay Dashboard
Suggested payer details
Use suggested payer details when you already know the customer’s preferred PayID or bank details.
What this helps with
- reduces customer input during checkout
- helps guide customers toward the expected payment account
- can improve conversion by making the payment experience faster and simpler
How it can be used
- prefill a customer’s PayID
- prefill customer bank details where supported
- in some flows, payer details can also be guided more strictly so the expected account is used
What to expect
- the hosted payment experience displays the provided payer details
- this is most useful when the merchant already knows which payer account should be used
- this is to be provided in the API call
Branding and appearance
Use branding settings to make the hosted payment experience feel like part of your business.
You can configure
- logo
- theme or accent colour
Why it matters
- creates a more familiar customer experience
- helps the hosted flow feel consistent with your brand
- reduces the sense that customers are leaving your environment to complete payment
What to expect
- your branding is applied throughout the hosted Pay by Bank App experience
- these settings are self-service through the Azupay Dashboard
Support-managed settings
Some Pay by Bank App settings are managed by Azupay and may require a support request to change.
Examples include
- whether PayTo is offered as a once-off experience or as a return-enabled experience
- default merchant-level settings applied to PayTo agreements
- other backend-managed payment experience defaults
What to expect
- these settings are not always self-service in the portal
- if you need to change them, contact Azupay support
When to raise a support request
- when you want to change how PayTo behaves for your hosted checkout
- when you need merchant-level defaults updated, such as agreement-related settings
Use the checkoutUrl
checkoutUrlOnce your Payment Request has been created, use the returned checkoutUrl to direct the customer into the hosted Pay by Bank App experience.
The checkoutUrl can be:
- opened as a redirect
- embedded in an iFrame, where supported
The hosted experience will then:
- present the configured payment methods
- reflect your default payment method order
- display your branding
- guide the customer through the payment journey based on your selected configuration
Redirect
Redirect after payment If you supply a query string parameter called redirectURL at the end of URL supplied in PaymentRequestStatus.checkoutUrl, then we will redirect your user to this URL after the payment has been received. The redirectURL must be url encoded. For example:
The payer will be redirected to https://www.mywebsite.com?myparam=something
Cancel Redirect
The page will display a Cancel button if you supply a query string parameter cancelRedirectURL. The PayID associated with the payment request is deregistered when a user clicks Cancel.
The cancelRedirectURL must be url encoded. For example:
https://pay.azupay.com.au/v2/checkout/ZDk2YzkxYTUyYjYzYTIwMzk3?cancelRedirectURL=https%3A%2F%2Fwww.mywebsite.com%3Fpage%3Dhome When the user click the Cancel button, then we will redirect your user to this URL (i.e. https://www.mywebsite.com?page=home (opens new window))
iFrame implementations
The following details are relevant for those using the UX solutions with an iFrame implementation.
If you use the iframe version, the page will send events with changes on the Payment Request status so you can use these events to remove the iframe instead. Keep reading for more information about how to use the events generated by the iFrame.
Receiving events from the iframe
The host web app can react to changes within the PayID Checkout UX payment solution by listening to message events being emitted from the iframe. This would give the host web app more control over the entire checkout process and thus allow for a better user experience.
Consuming events from the host HTML page
In order to consume the events from the host web app you will add an event listener to the main window and capture events of type message. Then the main payload of the event will be inside the event.data. There are other fields inside the event that can be helpful, for example the origin field as shown in line 3 can be used to filter out if you have more than one iframe rendered sending message events at the same time.
JavaScript
window.addEventListener('message', (event) => {
    console.log('Event Data ' + JSON.stringify(event.data))
    console.log('Event Origin ' + JSON.stringify(event.origin))
    console.log('Event Ports ' + JSON.stringify(event.ports))
    if (event.data.EventType === 'UserInterface') {
        const clientIframe = document.getElementById('client-iframe');
        clientIframe.height = event.data.Data.height;
        const height = document.getElementById('height');
        height.innerText = event.data.Data.height;
    }
    if (event.data.EventType === 'PaymentRequest') {
        const status = document.getElementById('payment-request-status');
        status.innerText = event.data.Data.PaymentRequestStatus.status;
    }
})
If you want to see a working example and try the iframe approach you can use our iframe tester HTML.
Currently, there are two types of events described below.
Resizing Events
These type of events will notify the parent window about changes to the width of the content rendered within the iframe. This way the parent page can make the iframe bigger to prevent it from rendering scrolling bars.
The following is an example of a resizing event:
{
  "EventType": "UserInterface",
  "Timestamp": "2022-12-02T05:20:06.506Z",
  "Data": {
    "height": 651
  }
}
UX payment solution responsiveness and QR code visibilityNote that the PayID Checkout UX payment solution will hide the QR code when the width of the iframe is less than 600px
Payment Request status events
These type of events notify on the full PaymentRequest and PaymentRequestStatus object from the API so that the parent web app can react to changes on the state. For example, remove the iframe when the payment has been completed.
The following is an example of the Payment Request event:
{
  "EventType": "PaymentRequest",
  "Timestamp": "2022-12-02T05:18:56.250Z",
  "Data": {
    "PaymentRequest": {
      "clientId": "0038ae8a0989a81ccf92bfead1bdfe18",
      "multiPayment": true,
      "clientTransactionId": "61d0f44d-3d84-4fd1-a02e-7cc9957256d6",
      "payID": "[[email protected]](mailto:[email protected])",
      "paymentAmount": 20,
      "paymentExpiryDatetime": "2022-12-03T19:58:51.027Z",
      "paymentDescription": "Enter your order number in reference field"
    },
    "PaymentRequestStatus": {
      "createdDateTime": "2022-12-02T05:15:51.147Z",
      "paymentRequestId": "499112286f20771a678d6af05bb36e6c",
      "status": "WAITING"
    }
  }
}
Updated 3 months ago