Integration Guide
A short guide on integrating the Pay by Bank (v3) UX solution using the Payment Agreement Request API
Payment Agreement Request API
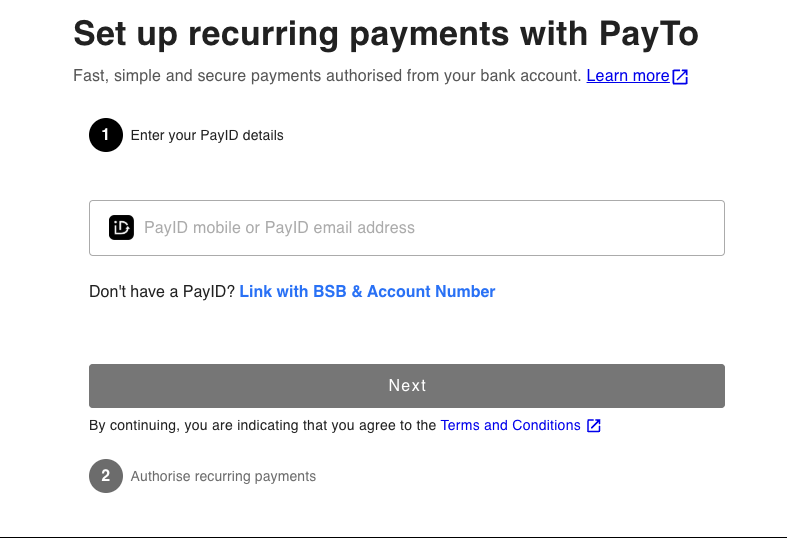
To use the Pay by Bank UX solution, simply integrate to the Payment Agreement Request API.
Call the paymentAgreementRequest API
- In the response body of the POST /v1/paymentAgreementRequest call, there will be a field called
sessionUrl - Present this URL to your customer using any means appropriate, you could:
- Embed into an iframe element and include it in your website. Note that the iFrame will be automatically detected for new integrations.
- Surface in a new pop-out window
- Send the link via an email
- Send the link via an sms
- Embed it into a QR code
- Once the agreement has been authorised, the payer will see a confirmation
Key Configurations
The payment experience can be configured to suit the needs of your use case. In the table below configurations may be set by URL parameters, values in the API calls or set in your specific client configuration.
| Experience | Configuration | Comments |
|---|---|---|
| Agreement amount | agreementMaximumAmount | The PayTo agreement's maximum amount. By default this will be set to a value configured in your client configuration i.e. $200. |
| Start date | agreementStartDate | The start date of the PayTo agreement. By default this will be set to today. |
| agreementEndDate | The end date of the PayTo agreement. By default this will be set to no end date. | |
| agreementFrequency | The frequency (daily, weekly, monthly, etc) of payments. By default this will be set to adhoc. | |
| agreementCountPerPeriod | The number of payments per frequency. | |
| suggestedPayerDetails | If you know the payers PayID or BSB & Account Number they can be provided in this section. This will then be pre-populated in the Subscriptions UX. | |
| Redirect | RedirectURL | If a RedirectURL is provided the payer, upon successful approval of the PayTo agreement, the payer will be directed to the specified URL. This can be provided via query parameters. |
| Cancel | cancelRedirectURL | If a cancelRedirectURL is provided the payer sees a cancel button. Hitting the cancel button will send the payer to the specified URL. This can be provided via query parameters. |
iFrame implementations
The following details are relevant for those using the UX solutions with an iFrame implementation.
Receiving events from the iframe
The host web app can react to changes within the PayID Checkout UX payment solution by listening to message events being emitted from the iframe. This would give the host web app more control over the entire checkout process and thus allow for a better user experience.
Consuming events from the host HTML page
In order to consume the events from the host web app you will add an event listener to the main window and capture
events of type message. Then the main payload of the event will be inside the event.data. There are other fields inside the event that can be helpful, for example the origin field as shown in line 3 can be used to filter out if you have more than one iframe rendered sending message events at the same time.
JavaScript
window.addEventListener('message', (event) => {
    console.log('Event Data ' + JSON.stringify(event.data))
    console.log('Event Origin ' + JSON.stringify(event.origin))
    console.log('Event Ports ' + JSON.stringify(event.ports))
    if (event.data.EventType === 'UserInterface') {
        const clientIframe = document.getElementById('client-iframe');
        clientIframe.height = event.data.Data.height;
        const height = document.getElementById('height');
        height.innerText = event.data.Data.height;
    }
    if (event.data.EventType === 'PaymentRequest') {
        const status = document.getElementById('payment-request-status');
        status.innerText = event.data.Data.PaymentRequestStatus.status;
    }
})
If you want to see a working example and try the iframe approach you can use our iframe tester HTML.
Currently, there are two types of events described below.
Resizing Events
These type of events will notify the parent window about changes to the width of the content rendered within the iframe. This way the parent page can make the iframe bigger to prevent it from rendering scrolling bars.
The following is an example of a resizing event:
{
  "EventType": "UserInterface",
  "Timestamp": "2022-12-02T05:20:06.506Z",
  "Data": {
    "height": 651
  }
}
UX payment solution responsiveness and QR code visibilityNote that the PayID Checkout UX payment solution will hide the QR code when the width of the iframe is less than 600px
Payment Request status events
These type of events notify on the full PaymentRequest and PaymentRequestStatus object from the API so that the parent web app can react to changes on the state. For example, remove the iframe when the payment has been completed.
The following is an example of the Payment Request event:
{
  "EventType": "PaymentRequest",
  "Timestamp": "2022-12-02T05:18:56.250Z",
  "Data": {
    "PaymentRequest": {
      "clientId": "0038ae8a0989a81ccf92bfead1bdfe18",
      "multiPayment": true,
      "clientTransactionId": "61d0f44d-3d84-4fd1-a02e-7cc9957256d6",
      "payID": "[[email protected]](mailto:[email protected])",
      "paymentAmount": 20,
      "paymentExpiryDatetime": "2022-12-03T19:58:51.027Z",
      "paymentDescription": "Enter your order number in reference field"
    },
    "PaymentRequestStatus": {
      "createdDateTime": "2022-12-02T05:15:51.147Z",
      "paymentRequestId": "499112286f20771a678d6af05bb36e6c",
      "status": "WAITING"
    }
  }
}
Full Example
Below is the sample code for the entire HTML page
       <html lang="en">
<head>
    <meta charset="UTF-8">
    <title>Title</title>
    <meta name="viewport" content="width=device-width, initial-scale=1" />
    <script>
        window.addEventListener('message', (event) => {
            console.log('Event Data ' + JSON.stringify(event.data))
            console.log('Event Origin ' + JSON.stringify(event.origin))
            console.log('Event Ports ' + JSON.stringify(event.ports))
      if (event.data.EventType === 'UserInterface') {
            const clientIframe = document.getElementById('client-iframe');
            clientIframe.height = event.data.Data.height;
            const height = document.getElementById('height');
            height.innerText = event.data.Data.height;
        }
        if (event.data.EventType === 'PaymentRequest') {
            const status = document.getElementById('payment-request-status');
            status.innerText = event.data.Data.PaymentRequestStatus.status;
        }
    })

    const updateUrl = () => {
        const input = document.getElementById('payment-request');
        const url = input.value;
        const iframe = document.getElementById('client-iframe');
        iframe.src = url;
    }

</script>
</head>
<body>
<div>
    <div>
        <label for="payment-request">Put the encoded id of PR</label>
        <input id="payment-request" data-test="url-input"/>
        <button onclick="updateUrl()" data-test="submit">Submit</button>
    </div>
    <div>
        <div>Status:</div>
        <div data-test="payment-request-status" id="payment-request-status"></div>
    </div>
    <div>
        <div>Height:</div>
        <div data-test="height" id="height"></div>
    </div>
    <iframe id="client-iframe"
            title="PayID payment"
            src=""
            style="border: 1px solid #000000; width: 100%;"
    />
</div>
<div>
</div>
<script>
 </script>
</body>
</html>
Embedding the Subscriptions UX payment solution as an iframe
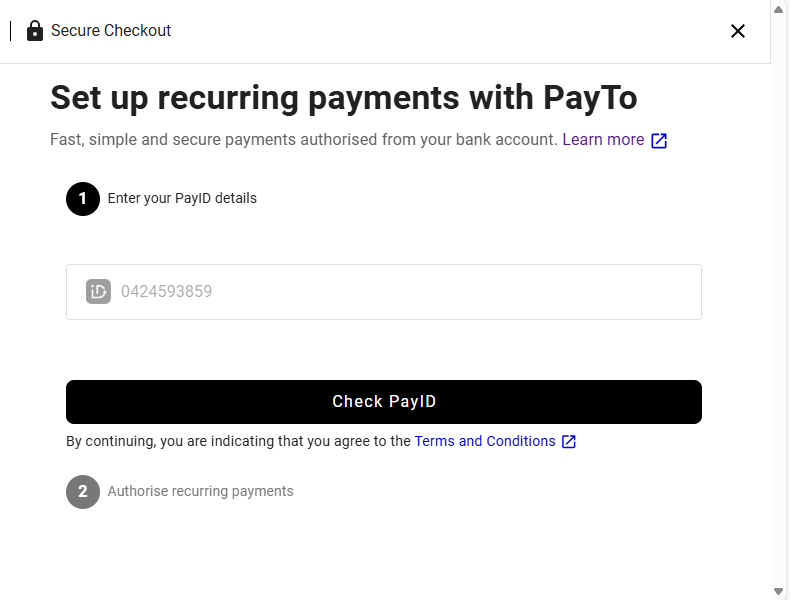
This UX payment solution will detect automatically when its running inside an HTML iframe and will render a stripped down version without logo or theme customisations so that it would visually blend with your web application.
Below is a sample page with the iframe version of the PayID Checkout UX payment solution embedded into it.

Receiving events from the iframe
The host web app can react to changes within this UX payment solution by listening to message events being emitted within the iframe. This would give the host web app more control over the entire checkout process and thus allow for a better user experience.
Consuming events from the host HTML page
In order to consume the events from the host web app you will add an event listener to the main window and capture
events of type message. Then the main payload of the event will be inside the event.data. There are other fields inside the event that can be helpful, for example the origin field as shown in line 3 can be used to filter out if you have more than one iframe rendered sending message events at the same time.
window.addEventListener('message', (event) => {
    console.log('Event Data ' + JSON.stringify(event.data))
    console.log('Event Origin ' + JSON.stringify(event.origin))
    console.log('Event Ports ' + JSON.stringify(event.ports))
    if (event.data.EventType === 'UserInterface') {
        const clientIframe = document.getElementById('client-iframe');
        clientIframe.height = event.data.Data.height;
        const height = document.getElementById('height');
        height.innerText = event.data.Data.height;
    }
    if (event.data.EventType === 'PaymentAgreementRequest') {
        const status = document.getElementById('payment-request-status');
        status.innerText = event.data.Data.PaymentRequestStatus.status;
    }
})
If you want to see a working example and try the iframe approach you can use our iframe tester HTML.
Currently, there is two types of events fully described below.
Resizing Events
These type of events will notify the parent window about changes to the width of the content rendered within the iframe. This way the parent page can make the iframe bigger to prevent it from rendering scrolling bars.
The following is an example of a resizing event:
{
  "EventType": "UserInterface",
  "Timestamp": "2022-12-02T05:20:06.506Z",
  "Data": {
    "height": 651
  }
}
UX payment solution responsiveness and QR code visibilityNote that this UX solution will hide the QR code when the width of the iframe is less than 600px
Payment Agreement Request status events
These types of events notify on the status of the PaymentAgreementRequest so that the parent web app can react to changes on the state. For example, remove the iframe when the payment has been completed.
The following is an example of the Payment Request event
{
  "EventType": "PaymentAgreementRequest",
  "Timestamp": "2022-12-02T05:18:56.250Z",
  "Data": {
    "status": "AGREEMENT_CREATED"
  }
}
The UX will raise events with the following statuses:
- WAITING: Initial status when the UX has rendered
- AGREEMENT_CREATED: When an agreement has been created and it is awaiting approval from the payer.
- AGREEMENT_APPROVED: When the agreement has been approved by the payer. This marks a successful transaction so at this point the
iframecan be destroyed and the payer can be redirected to the next steps in the parent web app. - AGREEMENT_CANCELLED: The transaction failed and cannot be recovered. This marks the end of the transaction a a new
PaymentAgreementRequestwould have to be created to try again.
Full example
Below is the sample code for the entire HTML page
<!DOCTYPE html>
<html lang="en">
<head>
    <meta charset="UTF-8">
    <title>Title</title>
    <meta name="viewport" content="width=device-width, initial-scale=1" />
    <script>
        window.addEventListener('message', (event) => {
            console.log('Event Data ' + JSON.stringify(event.data))
            console.log('Event Origin ' + JSON.stringify(event.origin))
            console.log('Event Ports ' + JSON.stringify(event.ports))

            if (event.data.EventType === 'UserInterface') {
                const clientIframe = document.getElementById('client-iframe');
                clientIframe.height = event.data.Data.height;
                const height = document.getElementById('height');
                height.innerText = event.data.Data.height;
            }
            if (event.data.EventType === 'PaymentAgreementRequest') {
                const status = document.getElementById('payment-request-status');
                status.innerText = event.data.Data.status;
            }
        })

        const updateUrl = () => {
            const input = document.getElementById('payment-request');
            const url = input.value;
            const iframe = document.getElementById('client-iframe');
            iframe.src = url;
        }

    </script>
</head>
<body>
<div>
    <div>
        <label for="payment-request">Put the encoded id of PR</label>
        <input id="payment-request" data-test="url-input"/>
        <button onclick="updateUrl()" data-test="submit">Submit</button>
    </div>
    <div>
        <div>Status:</div>
        <div data-test="payment-request-status" id="payment-request-status"></div>
    </div>
    <div>
        <div>Height:</div>
        <div data-test="height" id="height"></div>
    </div>
    <iframe id="client-iframe"
            title="Pay By Bank Agreement"
            src=""
            style="border: 1px solid #000000; width: 100%;"
    />
</div>
<div>
</div>
<script>

</script>
</body>
</html>
Suggested Payer Prefill
To support merchants with strict account verification requirements, this enhancement ensures that payer details—such as PayID or BSB/Account—are securely prefilled and locked when creating a PaymentAgreementRequest via Subscriptions app.
In order to prefill BSB/account number or PayID field shown to your customer, simply send in a value in suggestedPayerDetails field. Please refer to this Payment AgreementRequest API file specification for further details.
Note: If you send in a value to suggestedPayerDetails, your customer will not be able to edit the PayID or BSB/Account number in this field when it is shown to them on the UI

Updated 6 months ago
