Testing & integration Pay by Bank
Comprehensive test cases for API integration and UI testing
Create Payment Request - positive test cases (API integration)
Test Case 1: Create payment request - amount set
- Steps to Complete: Call paymentRequest API with a POST request: https://api-uat.azupay.com.au/v1/paymentRequest
At minimum, send in: clientID, clientTransactionId, paymentAmount, paymentDescription
Can send in: paymentNotificationEndpointUrl and
paymentNotificationAuthorizationHeaderValue if you are expecting a webhook notification upon successful completion of payment - Sample Request Body:
{
    "PaymentRequest": {
        "clientId": "YourClientID",
        "clientTransactionId": "TX5346423452345345",
        "paymentAmount": 220,
        "paymentDescription": "Test payment1",
        "paymentNotification": {
        "paymentNotificationEndpointUrl": "https://pds-test-staging.free.beeceptor.com",
        "paymentNotificationAuthorizationHeaderValue": "string"
        }
    }
}- Expected outcome: Receive API response 200: Payment Request Created
- Notes: Aligned to configuring a single-use one-off payment
Test Case 2: Create payment request - with payment expiry set
- Steps to Complete: Call paymentRequest API with a POST request
https://api-uat.azupay.com.au/v1/paymentRequest
At minimum, send in: clientID, clientTransactionId, paymentDescription, paymentExpiryDatetime
Can send in: paymentNotificationEndpointUrl and paymentNotificationAuthorizationHeaderValue if you are expecting a webhook notification upon successful completion of payment - Sample Request Body:
{ "PaymentRequest": { "clientId": "YourClientID", "clientTransactionId": "TX5346423452345345", "paymentAmount": 220, "paymentDescription": "Test payment1", "paymentExpiryDatetime": "2023-11-16T06:32:31.250Z" "paymentNotification": { "paymentNotificationEndpointUrl": "https://pds-test-staging.free.beeceptor.com", "paymentNotificationAuthorizationHeaderValue": "string" } } } - Expected outcome: Receive API response 200: Payment Request Created
- Notes: Aligned to configuring any payment request where user has a set amount of time to pay before payment request expires
Create Payment Request - exception test cases (API integration)
-
Test Case 3: Create payment request - missing required field
- Steps to Complete: Call paymentRequest API with a POST request
https://api-uat.azupay.com.au/v1/paymentRequest
Send in: clientID, clientTransactionId, paymentAmount
Omit: paymentDescription - Sample Request Body:
{ "PaymentRequest": { "clientId": "YourClientID", "clientTransactionId": "TX5346423452345345", "paymentAmount": 220, "paymentNotification": { "paymentNotificationEndpointUrl": "https://pds-test-staging.free.beeceptor.com", "paymentNotificationAuthorizationHeaderValue": "string" } } } - Expected outcome: Receive API response 400: Bad request response
Test Case 4: Create payment request - invalid clientID
- Steps to Complete: Call paymentRequest API with a POST request
https://api-uat.azupay.com.au/v1/paymentRequest
Send in: clientID, clientTransactionId, paymentAmount, paymentDescription
Test with client ID that is made up and will not be recognised by the Azupay core payments plattform - Sample Request Body:
{ "PaymentRequest": { "clientId": "Client1234", "clientTransactionId": "TX5346423452345345", "paymentAmount": 220, "paymentDescription": "Test payment1", "paymentNotification": { "paymentNotificationEndpointUrl": "https://pds-test-staging.free.beeceptor.com", "paymentNotificationAuthorizationHeaderValue": "string" } } } - Expected outcome: Receive API response 400: Expecting YourClientID but received Client1234
Test Case 5: Create payment request - negative payment amount
- Steps to Complete: Call paymentRequest API with a POST request
https://api-uat.azupay.com.au/v1/paymentRequest
At minimum, send in: clientID, clientTransactionId, paymentAmount, paymentDescription
Send in negative payment amount - Sample Request Body:
{ "PaymentRequest": { "clientId": "YourClientID", "clientTransactionId": "TX5346423452345345", "paymentAmount": -200, "paymentDescription": "Test payment1", "paymentNotification": { "paymentNotificationEndpointUrl": "https://pds-test-staging.free.beeceptor.com", "paymentNotificationAuthorizationHeaderValue": "string" } } } - Expected outcome: Receive API response 400: Invalid request
Test Case 6: Create payment request - duplicate Transaction ID
- Steps to Complete: Call paymentRequest API with a POST request
https://api-uat.azupay.com.au/v1/paymentRequest
At minimum, send in: clientID, clientTransactionId, paymentAmount, paymentDescription
Send in duplicated clientTransaction ID - Sample Request Body:
{ "PaymentRequest": { "clientId": "Client1234", "clientTransactionId": "TX5346423452345345", "paymentAmount": 220, "paymentDescription": "Test payment1", "paymentNotification": { "paymentNotificationEndpointUrl": "https://pds-test-staging.free.beeceptor.com", "paymentNotificationAuthorizationHeaderValue": "string" } } } - Expected outcome: Receive API response 200: Payload of original payment using this clientTransactionID
Payment request actions (API integration)
Test Case 7: Retrieve existing payment request
- Steps to Complete: Call paymentRequest API with a GET request
https://api-uat.azupay.com.au/v1/paymentRequest
Send in Payment Request ID - Sample Request Body: URL Query Param: id=1234567890
- Expected outcome: Receive API response: 200 (Payment Request Object)
Test Case 8: Delete a payment request
- Steps to Complete: Call paymentRequest API with a DELETE request
https://api-uat.azupay.com.au/v1/paymentRequest
Send in Payment Request ID - Sample Request Body: URL Query Param: id=1234567890
- Expected outcome: Receive API response: 204 Payment Request Deleted
UI testing - happy path
Test Case 9 :Initial agreement setup and payment confirmation
-
Steps to Complete: Enter in 0400123123 to the “Enter your PayID details” input box.
Enter in 111 222 to the “Enter 6 digit code” input field -
Expected outcome: After entering correct OTP code, the text in green will say “This PayID is registered to “XXX YYY”.
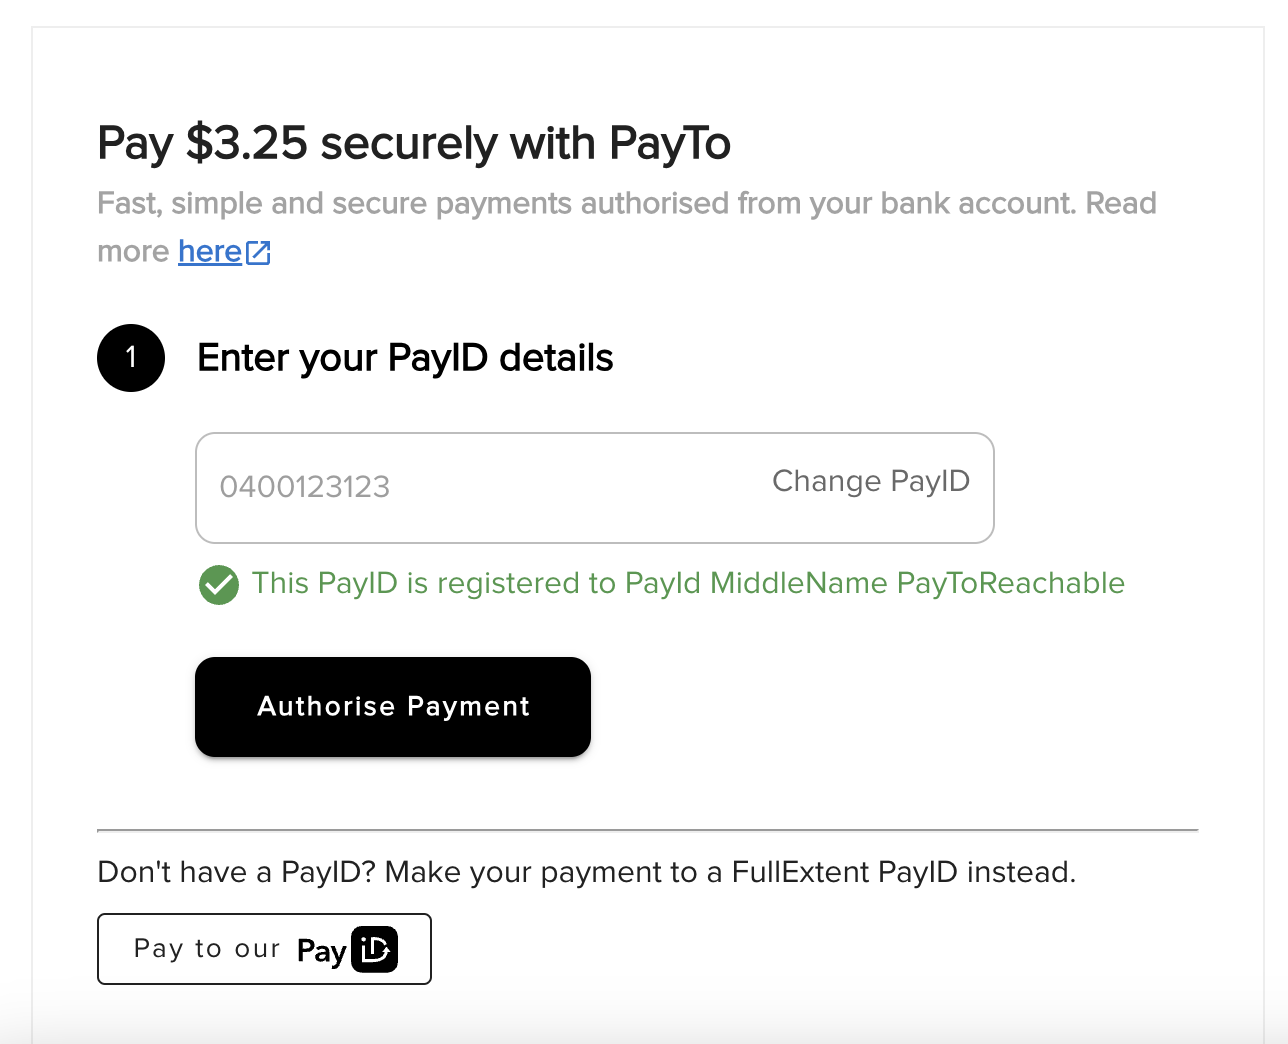
Agreement will then get approved and change to an ACTIVE state:
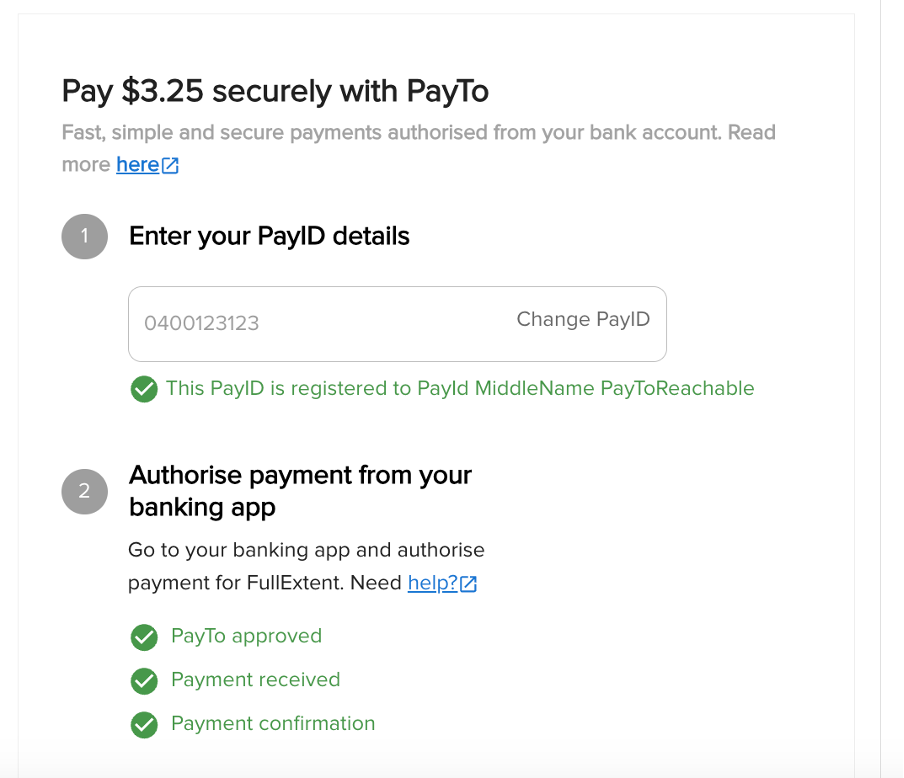
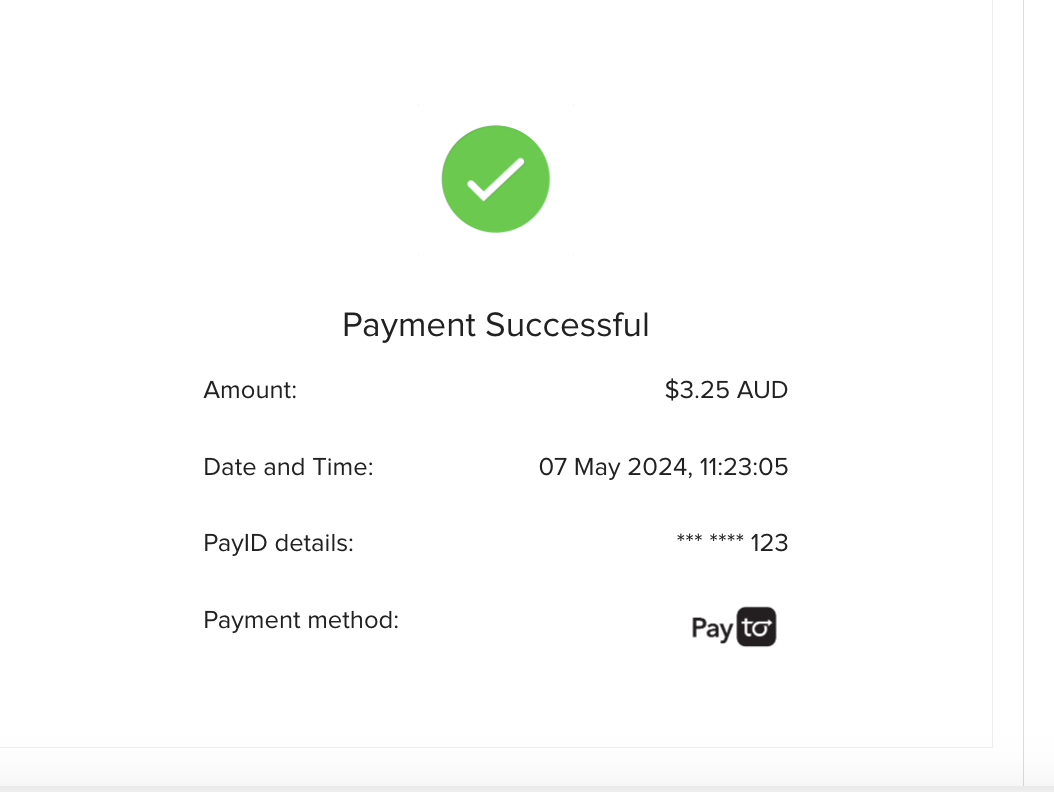
Test Case 10 : Make payment to PayID - (PayID fallback option): correct amount paid
-
Steps to Complete: Navigate to Azupay Testbank (UAT simulated banking environment to make test payments)
Enter in PayID from Payment Request created, click Verify button
Enter ‘Amount to pay’ and hit ‘Pay Now’ button
Call paymentRequest API with a GET request to check payment status has changed
https://api-uat.azupay.com.au/v1/paymentRequest
Send in Payment Request -
Expected outcome: After payment made with Testbank, the following screen should be displayed:

UI testing - unhappy paths
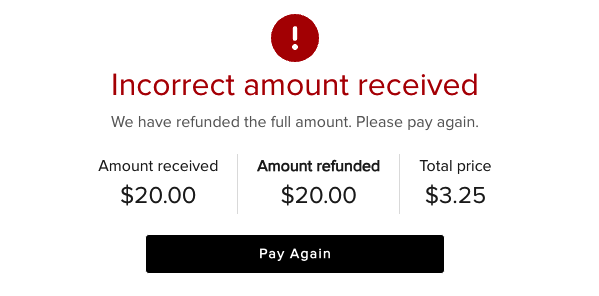
Test Case 11 : Make payment to PayID - (PayID fallback option): incorrect amount paid
- Steps to Complete: Navigate to Azupay Testbank (UAT simulated banking environment to make test payments)
Enter in PayID from Payment Request created, click Verify button
Enter ‘Amount to pay’ (ensure amount paid is different to the payment amount requested) and hit ‘Pay Now’ button
Call paymentRequest API with a GET request to check payment status has changed
https://api-uat.azupay.com.au/v1/paymentRequest
Send in Payment Request - Expected outcome: After payment made with Testbank, the following screen should be displayed:
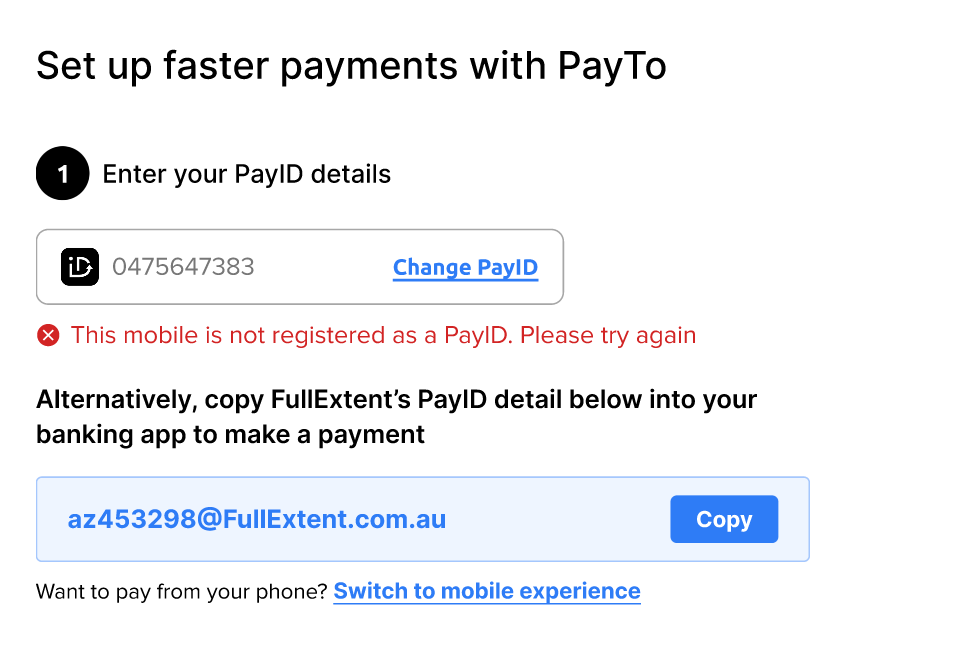
Test Case 12 : PayID entered is not registered
-
Steps to Complete: Enter in 0444 222 333 to the “Enter your PayID details” input box on the first 1-click Checkout app landing page
Enter in 111 222 to the “Enter 6 digit code” input field -
Expected outcome:
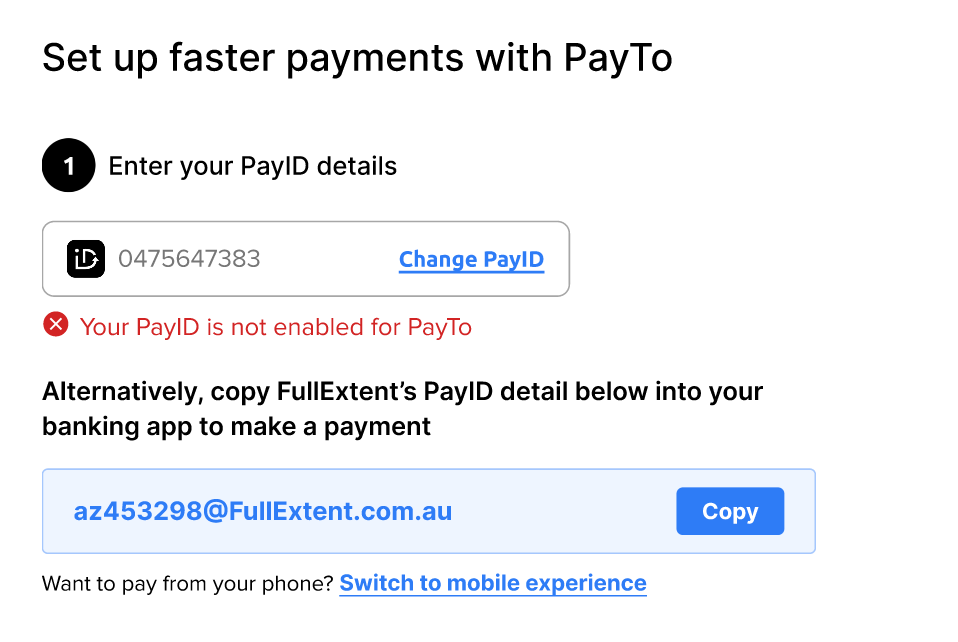
Test Case 12: PayID entered does not support PayTo
-
Steps to Complete: Enter in 0454 444 555 to the “Enter your PayID details” input box on the first 1-click Checkout app landing page
-
Expected outcome:
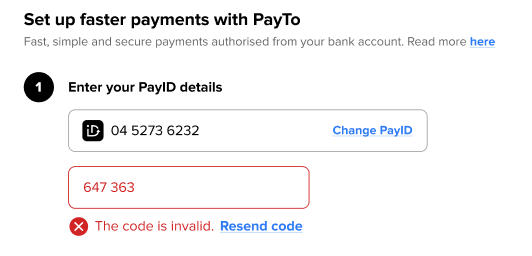
Test Case 13: Incorrect OTP entered
-
Steps to Complete: Enter in any 6 digit number except “111 222” to the “Enter 6 digit code” input field on the first 1-click Checkout app landing page
-
Expected outcome
Test Case 14: Payment cannot be processed
-
Steps to Complete:
Call paymentRequest API with a POST request
https://api-uat.azupay.com.au/v1/paymentRequest
At minimum, send in: clientID, clientTransactionId, paymentAmount = $77.77, paymentDescription
Ensure payment request is created with amount $77.77
Enter in 0400123123 to the “Enter your PayID details” input box -
Enter in 111 222 to the “Enter 6 digit code” input field
-
Expected outcome:

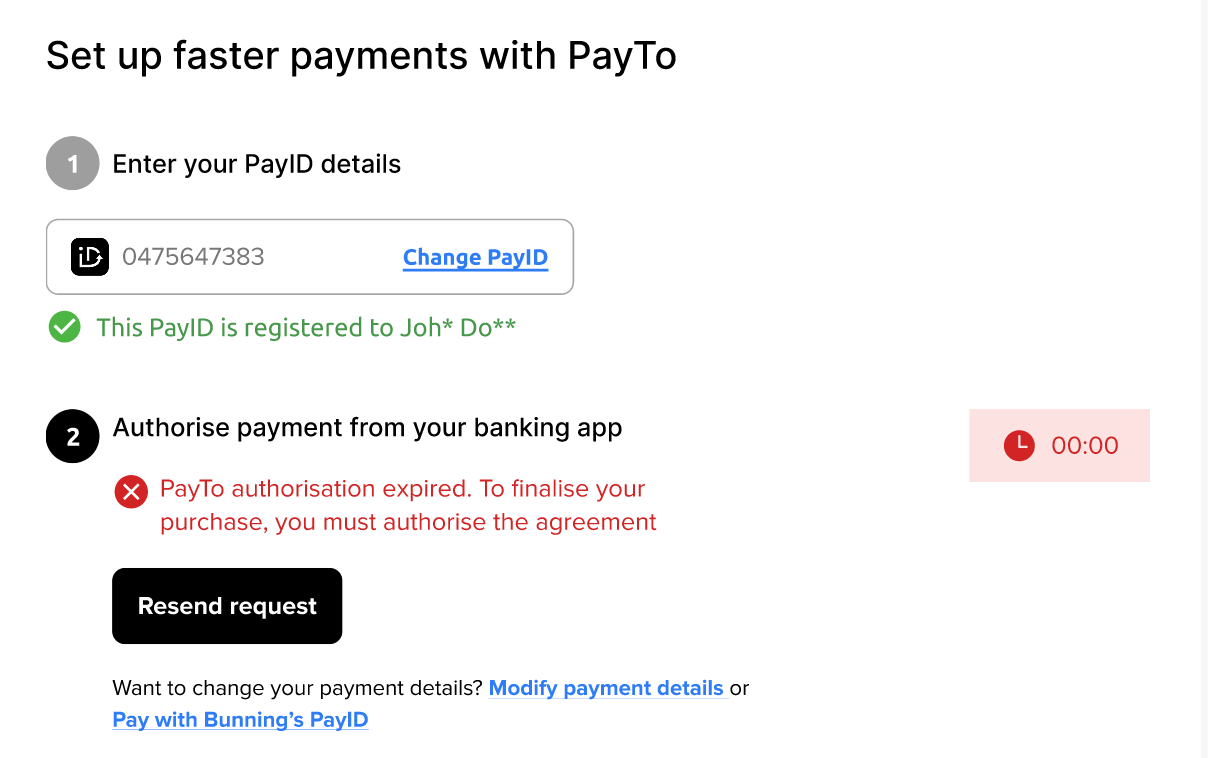
Test Case 15: Authorisation expired - countdown timer at 0 (agreement not authorised in time)
-
Steps to Complete:
Enter in 0472345678 to the “Enter your PayID details” input box
Enter in 111 222 to the “Enter 6 digit code” input field
The Payment Agreement created via the 1-click checkout app will stay in a CREATED state (simulating that the agreement is not approved) -
Expected outcome:
Test Case 16: Payment initiation fails with insufficient funds
-
Steps to Complete:
Enter in 0400111222 to the “Enter your PayID details” input box
Enter in 111 222 to the “Enter 6 digit code” input field -
Expected outcome:

Test Case 17 : Make payment to PayID - (PayID fallback option): incorrect amount paid
- Steps to Complete:
Navigate to Azupay Testbank (UAT simulated banking environment to make test payments)
TestBank - Accepting AzuPay
Enter in PayID from Payment Request created, click Verify button
Enter ‘Amount to pay’ (ensure this is different to PAyment Request amount) and hit ‘Pay Now’ button
Call paymentRequest API with a GET request to check payment status has changed
https://api-uat.azupay.com.au/v1/paymentRequest
Send in Payment Request ID - Expected outcome: After incorrect amount payment made with Testbank, the following screen should be displayed:

Initiating refunds
Test Case 18 : Partial refund API
- Steps to Complete: Call paymentRequest API with a POST request
https://api-uat.azupay.com.au/v1/paymentRequest/refund
Send in: paymentRequestID, refundAmount - Sample Request Body: URL Query Param: id=1234567890&refundAmount=5
- Expected outcome: Receive API response 200: Payment Refunded
Webhooks: RETURN_IN_PROGRESS and RETURN_COMPLETE
Test Case 19 : Full refund API
- Steps to Complete: Call paymentRequest API with a POST request
https://api-uat.azupay.com.au/v1/paymentRequest/refund
Send in: paymentRequestID - Sample Request Body: URL Query Param: id=1234567890
- Expected outcome: Receive API response 200: Payment Refunded
Webhooks: RETURN_IN_PROGRESS and RETURN_COMPLETE
Test Case 20 : Partial refund - Azupay dashboard
- Steps to Complete: Login to Azupay dashboard, navigate to Transactions, ensure Payment Requests is selected in the ‘Transaction type’ dropdown.
Find transaction (search using Client Transaction ID, PayID, Client branch, Date range)
Open accordian for transaction, enter amount to refund in the ‘Refund Amount’ field and click on button ‘Refund payment’, hit ‘Confirm’ to proceed with the partial refund - Expected outcome: Status of payment in the dashboard will change from ‘COMPLETE’ TO ‘RETURN_IN_PROGRESS’ to ‘RETURN_COMPLETE’
Test Case 21 : Full refund - Azupay dashboard
- Steps to Complete: Login to Azupay dashboard
Navigate to Transactions, ensure Payment Requests is selected in the ‘Transaction type’ dropdown
Find transaction (search using Client Transaction ID, PayID, Client branch, Date range)
Open accordian for transaction, click on button ‘Refund payment’, hit ‘Confirm’ to proceed with the full refund - Expected outcome: Status of payment in the dashboard will change from ‘COMPLETE’ TO ‘RETURN_IN_PROGRESS’ to ‘RETURN_COMPLETE’
Updated about 2 months ago