
Simple Integration Guide - Dynamic Single Use PayID
Introduction
A dynamic single-use PayID can only receive a single payment and is useful in situations where your customer makes a one-off purchase for goods or services or pays a single invoice or bill. This PayID can be personalised for a customer, in particular where that customer is known.
A typical use case for this scenario could be that your customers make a purchase on your website or online store or pay you for any other transaction such as:
- Buying airline tickets online and paying to the PayID you generate.
- Paying any invoice.
- Buying electronics or appliances from your online store.
- Recharging prepaid mobile plans or paying for a postpaid mobile bill
For such scenarios, you will need to create Payment Requests for each transaction. This will dynamically generate unique PayIDs, which they can send payments to from their bank account, and complete the transaction. You must use the PaymentRequest API to generate these unique PayIDs for your customers.
Cancelled transactionIf for some reason, your customers cancel their transaction before paying, the PayIDs that are generated will be deregistered and your customers can no longer pay to it. In rare cases, they do that, they will be instantly refunded. A new unique PayID will be generated if they go through with the payment process again.
Things to consider
We recommend that you consider the following settings before you begin:
- PayID domain: Your company's domain name that will be used in the PayID that is generated from a Payment Request. Example:
[email protected]. - ClientID: Your unique identifier for creating the request for payment. This is supplied by Azupay and only changes between environments.
- Client Transaction ID: This is the unique transaction ID that your system must generate for each Payment Request.
- MultiPayment: This must be set to False for this scenario.
- Amount: The amount must be set. Any payments to the PayID under or over the set amount will be automatically refunded to the payer. Only an exact payment for the set amount will be accepted.
- Payment Expiry: You can specify the date and time of the payment request expiry. This is particularly useful when your customers have limited time to pay for their transaction. For instance, they may have 10 minutes to pay for an airline ticket or 30 minutes to pay for an appliance once they have checked out and have landed in the payment page.
- Payment Description: This is the description of a transaction and will be the last part of the PayID description that appears in the customer's online banking when they lookup the PayID. It must not contain any of the customer's personal information.
- Payment Notification Endpoint URL: This is the webhook notification URL that Azupay will invoke when the status of an inflight PaymentRequest has reached the "COMPLETE" status.
- Payer UX: We highly recommend using one of our Checkout App for this. Azupay's PayID Checkout App has been designed to optimise the payer experience using PayID to pay to you. While PayID based payments offer great benefits the experience is new so an optimum UX is important to help your payers complete their journeys successfully. Based on our user research and understanding of payment behaviours, we have designed and tested the App to maximise conversion rate of payments and reduce the integration effort required by you. For more information, see https://developer.azupay.com.au/docs/user-guide.
User Experience Flow
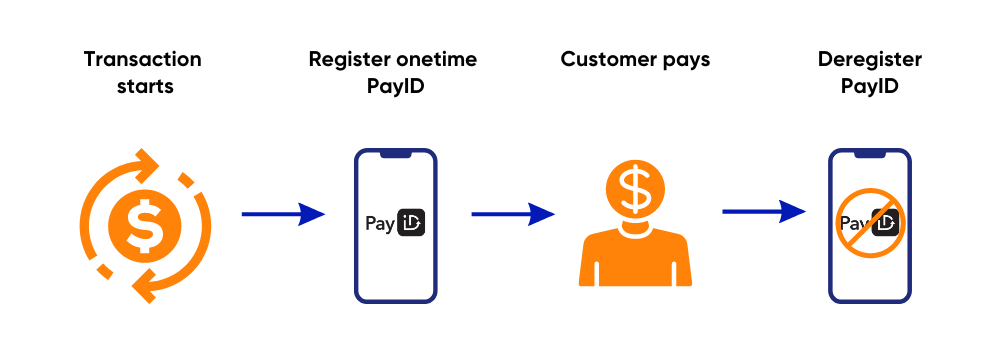
The typical user flow in this scenario will generally follow this pattern:
| Step # | Title | Description |
|---|---|---|
| 1 | Request creation of PayID/s | This can be done by calling the Payment Request API by considering the above settings |
| 2 | Present PayID | On successful creation of PayID, present it to your customers. Consider using our checkout app to present the PayID. |
| 3 | Correct payment received via PayID | Once your customers pay, the funds will be credited directly to your settlement account. The PayID will be deregistered. |
| 4 | Incorrect payment received via PayID | If an under or over payment is made to the PayID, we will send the funds back to the payer using the original debtor details. Only a payment for the exact set amount will be accepted. This will be reflected in the status of the paymentRequest as a failed attempt with a time-stamp. |
API Request
Once you have considered the above settings, pass the Payment Request API. A sample API request body is as per below:
{
  "PaymentRequest": {
    "payID": "[email protected]",
    "clientId": "12345",
    "clientTransactionId": "tx123456",
    "multiPayment": false,
    "paymentAmount": 200,
    "paymentDescription": "apple iphone pro",
    "paymentExpiryDatetime": "04-04-2024-23:59"
  }
}
API Response
Once you've sent the Payment Request API, expect to receive a response from us, which will include the unique PayID that your customer can pay to.
{
  "PaymentRequest": {
    "clientId": "12345",
    "clientTransactionId": "tx123456",
    "paymentDescription": "apple iphone pro",
    "multiPayment": false,
    "paymentAmount": 200
  },
  "payID": "[email protected]",
  "checkoutUrl": "https://pay-stg.azupay.com.au/v2/checkout/QVpVUEFZU3VwcG9ydENsaWVudC9kZDdiOTMyMzJkZDllZDlkZjEyOTg5ZmY4MDJiZjVjNi9BWlVQQVkgU3VwcG9ydC9QYXlJRA==",
  "paymentExpiryDatetime": "2024-04-14T00:29:11.900Z",
  "PaymentRequestStatus": {
    "paymentRequestId": "dd7b93232dd9ed9df12989ff802bf5c6",
    "status": "WAITING",
    "createdDateTime": "2024-04-12T00:29:11.900Z"
  }
}
Important test cases to complete before go-live:
Create Payment Request - Single Use PayID
- Steps to Complete: Call paymentRequest API with a POST request: https://api-uat.azupay.com.au/v1/paymentRequest
At minimum, send in: clientID, clientTransactionId, paymentAmount, paymentDescription - Sample Request Body:
{ "PaymentRequest": { "clientId": "YourClientID", "clientTransactionId": "TX5346423452345345", "paymentAmount": 220, "paymentDescription": "Test payment1", ... } } - Expected outcome: Receive API response 200: Payment Request Created
Create payment request - with payment expiry set
- Steps to Complete: Call paymentRequest API with a POST request: https://api-uat.azupay.com.au/v1/paymentRequest
At minimum, send in: clientID, clientTransactionId, paymentDescription, paymentExpiryDatetime - Sample Request Body:
{ "PaymentRequest": { "clientId": "YourClientID", "clientTransactionId": "TX5346423452345345", "paymentDescription": "Test payment1", "multiPayment": true, "paymentExpiryDatetime": "2023-11-16T06:32:31.250Z" ... } } - Expected outcome: Receive API response 200: Payment Request Created
- Notes: Aligned to configuring any PayID payment request where user has a set amount of time to pay before payment request expires
Create payment request - dashboard
- Steps to Complete: Log into Azupay dashboard, click on ‘+ New Payment’ at top RHS of landing page. Fill out fields: Description, Amount, First name, Last name and hit ‘Create’ button.
At minimum, send in: clientID, clientTransactionId, paymentDescription, paymentExpiryDatetime - Expected outcome: Payment landing page with QR code, PayID and amount to pay displayed on the screen
Retrieve existing payment request
- Steps to Complete: Call paymentRequest API with a POST request: https://api-uat.azupay.com.au/v1/paymentRequest
Send in: Payment Request ID - Sample Request Body: URL Query Param: id=1234567890
- Expected outcome: Receive API response: 200 (Payment Request Object)
-
Delete payment request
-
Steps to Complete: Call paymentRequest API with a DELETE request: https://api-uat.azupay.com.au/v1/paymentRequest
Send in: Payment Request ID -
Sample Request Body: URL Query Param: id=1234567890
-
Expected outcome: Receive API response: 204 Payment Request Delete
Initiating refunds
Partial refund API
- Steps to Complete: Call paymentRequest API with a POST request
https://api-uat.azupay.com.au/v1/paymentRequest/refund
Send in: paymentRequestID, refundAmount - Sample Request Body: URL Query Param: id=1234567890&refundAmount=5
- Expected outcome: Receive API response 200: Payment Refunded
Webhooks: RETURN_IN_PROGRESS and RETURN_COMPLETE
Full refund API
- Steps to Complete: Call paymentRequest API with a POST request
https://api-uat.azupay.com.au/v1/paymentRequest/refund
Send in: paymentRequestID - Sample Request Body: URL Query Param: id=1234567890
- Expected outcome: Receive API response 200: Payment Refunded
Webhooks: RETURN_IN_PROGRESS and RETURN_COMPLETE
Partial refund - Azupay dashboard
- Steps to Complete: Login to Azupay dashboard, navigate to Transactions, ensure Payment Requests is selected in the ‘Transaction type’ dropdown.
Find transaction (search using Client Transaction ID, PayID, Client branch, Date range)
Open accordian for transaction, enter amount to refund in the ‘Refund Amount’ field and click on button ‘Refund payment’, hit ‘Confirm’ to proceed with the partial refund - Expected outcome: Status of payment in the dashboard will change from ‘COMPLETE’ TO ‘RETURN_IN_PROGRESS’ to ‘RETURN_COMPLETE’
Full refund - Azupay dashboard
- Steps to Complete: Login to Azupay dashboard
Navigate to Transactions, ensure Payment Requests is selected in the ‘Transaction type’ dropdown
Find transaction (search using Client Transaction ID, PayID, Client branch, Date range)
Open accordian for transaction, click on button ‘Refund payment’, hit ‘Confirm’ to proceed with the full refund - Expected outcome: Status of payment in the dashboard will change from ‘COMPLETE’ TO ‘RETURN_IN_PROGRESS’ to ‘RETURN_COMPLETE’
PayID Checkout app guidance
If you use our checkout app, then follow the below steps to ensure it is working for you as required:
PayID Checkout app - how do I use it?
Updated 12 months ago